
Almost all the frescoes that I have prepared previously, have cracked. This is probably because I only troweled one layer -- the intonaco -- onto the surface. Our goal in Lubbock then, is to paint a fresco that does not crack. In the first attempt, we will plaster 3 coats onto the Hardibacker surface -- a scratch coat, then a brown coat, and finally the intonaco -- before painting the fresco -- loosely following this English recipe online from the Saint Gregory of Sinai Monastery. Hopefully the 2 undercoats will keep the intonaco wet, enough to slow the drying, so that the surface painting will not crack.
Ken made an arched angle iron frame, and cut a piece of 1/4 inch Hardibacker cement board to fit inside it.

SCRATCH COAT
I soaked the Hardibacker board in a large garbage bag overnight, with distilled water. The picture is of the soaking panel in the bathtub.

Finding the right sand turned out to be a huge problem in Lubbock. The common advice is to use a washed, angular sand. I could not find silica sand of any grit in Lubbock, so we went with masonry sand from Armor Asphalt (not too far from Texas Tech University) for the scratch coat. I figured that might be what ancient fresco painters used, and helped myself to half a bucket from this pile.

For the first coat -- or scratch coat -- the formula asks for 1.5 parts of coarse sand, 1 part Portland Cement, 1 part slaked lime putty. We mixed all of these ingredients together thoroughly, with a putty knife in a plastic tub, adding enough distilled water to make the plaster spreadable (June 14).

On the side, we bought some foam from DWS Building Supply, and cut some pieces from it to see how well that support would take fresco plaster:

The trowel and other plastering tools needed, next to a cut square of foam.

Plastering some foam.

Preparing to plaster the arched Hardibacker panel. First we laid down 2 cut pieces of fiberglass mesh (perhaps fiberglass shade cloth or an old onion sack might be used as well), to add strength to the scratch coat. I have read of artists putting human hair in the plaster, for the same purpose.

Plaster from the tub was troweled over the mesh .

The scratch coat was smoothed with a plastic float.

We probably should have let the plaster set up a little more, before roughing the surface of the scratch coat up with a horse comb.

Then we covered the arched panel, and some smaller Hardibacker tiles, with plastic, to keep them from drying so fast. We left the foam squares open to the air.

I visited my storage unit in Midland, Texas to retrieve more fresco supplies (June 20).

The first coat of plaster on the foam square started cracking within minutes of applying it -- however we had left it exposed to the air to dry. 8 days later I returned to find big cracks (June 22).

Likewise, we did not cover the 2nd foam square with plastic, so it suffered cracks as well -- but not as big, because it sat further from the window, and thus further from the sun. The good news is that the dried lime plaster adhered nicely to the foam.

The main arch panel did not crack. We had covered this panel with plastic, to keep the first coat moist and slow down the drying. 8 days later (June 22) it was not entirely dry-- but I had soaked the panel overnight before troweling on the scratch coat.

A small section of the arch panel probably suffered efflorescence. That is, some impurities in the sand discolored the plaster.

BROWN COAT
We mixed 2 parts lime to 4 parts sand, using a plastic 9 ounce cup -- to make a stiff plaster (towards the consistency of clay) which we troweled on as a second layer, or "brown coat" (June 22). We used the same coarser sand that we mixed into the first "scratch coat."

Mixing with a putty knife.

After working the sand and the lime up a long time, we spread the mix thin, and discovered clumps and streaks of white lime. Had the sand been white instead of brownish, we would have thought that the plaster was done. Instead, we had to mix it more thoroughly.

Before mixing the plaster, we soaked the arched panel in distilled water.

Troweling a second layer -- the "brown coat" -- over the dried first "scratch coat" (June 22).

Roughing up the surface of the fresh brown coat plaster layer with a steel brush.

We covered the newly plastered arch panel with plastic, to keep it from drying too fast and cracking.

We put a piece of foam on top, so that the morning sun would not heat up the plastic, when it shined through the open window. The temperatures in Lubbock reached over 100° daily, since we started preparing this arch panel.

The browncoat did not crack. It was completely dry when I returned to Lubbock (July 3). Ken had taken the plastic covering off the previous Friday (July 1). It was a bit crumbly on the surface, where the metal brush pushed up the plaster. However we swept away those crumbs by hand, so they were not a problem. Since the temperatures in Lubbock had been in the 100s, I was very surprised that there were no cracks.

We took a break on the 4th of July, for the Centennial the picnic in Slaton, Texas, where Ken and Bobby Keys (the Rolling Stones saxophone player) are from. That city was celebrating 100 years of its existence. The picture below is of a "water polo" game kids played with fire hoses in the park.

INTONACO
Ken's preparations for a fresco painting of Lydia Mendoza.

Casual cartoon of the fresco drawing.

We started again by wetting down the dried surface with distilled water (July 5) several times. We poured off the standing water on the surface before troweling on the fresco plaster.

We mixed one part fine sand (30 grit) with one part lime putty, to make the plaster. Ultimately we used two 12 ounce scoops of sand to two 12 ounce scoops of lime putty.
Note: The lime putty is really too wet. So I tried to squeeze some of the water off with the blue mesh, but this did not work.

Mixing the lime and the sand.

The mixture came out to the consistency of cake frosting -- which is too wet -- when it should be the consistency of butter. However, a small amount of plaster was thick enough not to slide off the trowel.

Dumping the fresco plaster onto the panel.

Troweling. Ken says that we need to use a trowel with rounded edges.

Smoothing out the edges.

Unfortunately, bubbles started showing up. I had that problem before, probably because I did not soak the surface enough before troweling on plaster. I thought that we would avoid these kinds of problems by using 3 coats.

Finished troweling at 3:40 PM.
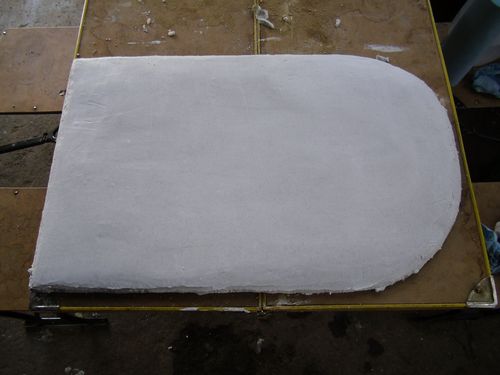
However, the surface was too wet to paint on then. So I left the panel in front of the door, where it was exposed to a wind, and apparently dried too fast. I should have covered the panel with plastic at this point, and let it dry slowly, perhaps for a few hours.

After an hour, the surface was ready to paint on (4:40 PM).

I then covered the surface with plastic, until Ken was ready to paint.

When we removed the plastic (in about a half hour), we discovered larger cracks at the edges, where the plaster was thin.

We also noticed small cracks in the lower part of the panel, which had been hanging over the side of the table, thus exposing both the wet and the back sides to the air. This makes the panel dry faster, leading to cracks. Since I had this problem before, so I pushed the panel completely onto the table when I noticed. Apparently I did not catch it fast enough.
Unfortunately, the 2 undercoats did not prevent the intonaco from cracking. Maybe if I had placed a piece of wet burlap next to the fresco, that would have kept the air moist enough to slow the drying, and prevent cracking. However, the coffee sack that I brought was nowhere to be found.

Ken spritzed the cracks with distilled water, in order to repair them.

Ken trying to rub the cracks out of the plaster, after wetting them down.

When Ken was ready to paint on the fresco, the sky and the wind threatened a hard rain, which would have come into the shop. Therefore Ken wrapped the damp panel in plastic, loaded it in his car, and drove it off to Slaton to paint on it later. Hopefully the fresco was still wet enough to paint on when he got home.
*****
Ken gave me the below photos on August 11, and explained what he did after he took the fresco piece home and painted it.
First Ken scraped the off the fresh plaster coat, as it had begun to dry:

He replastered the panel, adding milk to the plaster (he also added powdered milk, not pictured):

He laid out the colors:

He laid out his composition:


Ken drew the figure into the wet plaster, using an Xacto knift to draw in the cactus. Then he painted:

This fresco painting took 12 hours. Ken spritzed the surface with water often. He also mixed some of the pigments with lime and sand before painting with them. The immediate painting turned out brilliant, but it faded later as the lime dried and carbonated:

Ken says that it is easier to paint a fresco than to write a hit song.
No comments:
Post a Comment