The day before I prepared the intonaco plaster, after laying out all the supplies below:

One part lime putty, to one part 80 grit marble sand, both bought from American Clay:

The lime putty and sand mixed nicely, yielding a consistency like toothpaste:

I packaged the intonaco plaster in double Ziploc bags (one inside the other, to best keep all the air out). Each gallon bag contained -- two scoops of lime putty with two scoops of sand (24 ounce scoop). I made 2 bags of fresco plaster, and stored each bag in its own plastic container with an air-tight seal:

I soaked the Hardibacker cement board overnight in distilled water. Note all the bubbles that formed right after the water was poured. When we do not soak the Hardibacker panel long enough -- say for less than a half hour-- the bubbles can rise underneath the plaster, ripple the painting surface, and cause adhesion problems:

The next day I took the panel out and let it dry matte, so that no standing water remained on the surface (the edges pictured are too wet, and even the interior has a bit of sheen, which means that it could dry a tad more) :

Plaster soon after the whole panel has dried to a matte surface:

Plastering, using most of the Ziploc bag on a square foot panel (I also used the bigger, stiffer trowel -- not shown -- to press the plaster into the panel):

I finished plastering about 11:15 AM, and left the fresco panel in the open air. However, when Francisco started painting at about 2:30 PM -- 3 hours later -- the panel was really too wet:

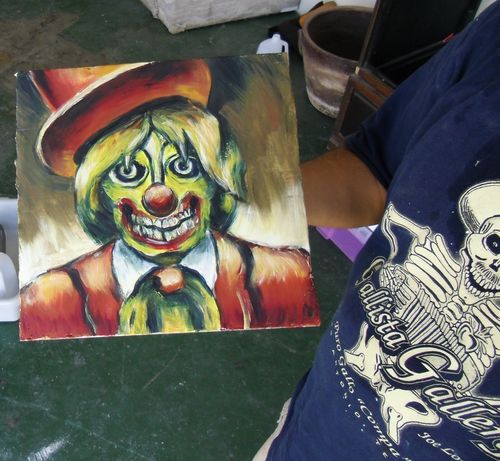
By the time Francisco had outlined the image, perhaps 30 minutes later, the surface was dry enough to properly paint on:

Midway, using mostly Mayacrom pigments and an earth red:

Francisco finished about 5 PM, at which time the fresco was too dry to continue painting on. A few small cracks surfaced at this point. It was a hot, dry summer day in El Paso, though we were indoors, but with no air conditioning:

We put the fresco panel in a plastic box (7 Liter, Really Useful Box, bought at Office Depot) and covered it with a lid, to keep the moisture in and slow the drying:

The fresco dried a few days later -- without the colors fading. Nevertheless, the cracks seemed to grow:

Francisco decided to try painting another test panel, so I prepared a fresco kit that he could take home (Aug 28). I gave him the 2nd Ziploc bag of fresco plaster (mixed Aug 20), which was still good:

Part of the take-home kit -- with one Hardibacker panel, a welded angle iron frame, and tube of heavy duty adhesive:

Trowels:

Pop top containers with pigments ground in distilled water; bristle, soft and striping brushes; and different size pounce wheels:

Francisco asked for lime water, to dilute the ground pigments for painting. He also asked for lime putty, to paint with as white color. Lastly he requested dry Maya blue pigment, which he will sprinkle over the pounced cartoon, to transfer the image onto the freshly plastered panel:

I made this color chart from the pigments I gave Francisco. The colors look so much fresher in person:

From left to right, colors:
(1) Mayacrom Blue, B2050 (2) Mayacrom Violet, V1000 (3) Mayacrom Red, R1000 (4) Mayacrom Green, G 1000, Lot: L5027 (5) Mayacrom Yellow, Y1000
(6) Yelllow Ochre (Domestic) PY43; Williamsburg (7) Raw Sienna from Badia Dolomites, Italy; Sinopia 40404 (8) Amberg Yellow, Dark Yellow from Germany; Sinopia K40280 ( 9) Raw Sienna brownish from England; Sinopia 40390 (10) Satin Ocher Greenish brown; Sinopia 4025
(11) Raw Umber; Artisan Santa Fe (12) Iron Oxide Mars Red, Bloodstone Red; Sinopia PCHR 1201 (13) Genuine Indian Red, natural hematite; Sinopia PCP400 (14) Pompeiian Red, PR101; Schmincke (15) Spanish Earth; Williamsburg
(16) Caput Mortuum reddish violet; Sinopia PCPTNR (17) Bohemian Green Earth, PG23; Schmincke (18) Trader Chuck's ground stone (red) (19) Trader Chuck's ground stone (green)
I used the leftover plaster from the first Ziploc bag to make the color chart, and that panel had not cracked by the next day. This time I only soaked the Hardibacker cement panel for an hour, and waited an hour and a half to paint, which was still too early. I started painting in the middle of the night, at 1 AM, and finished under an hour. I immediately put the panel inside a plastic box and covered it, to keep the plaster from drying too fast.
Well done! Thanks for posting all of this wonderful research on fresco. As someone who is also still learning it's helpful for me to see your experimentation and findings. If you're ever interested in sharing our findings let me know - Mike N. (mike.nichols@wku.edu)
ReplyDeleteP.S. here is a fresco introductory site my students started to assemble. It's not complete yet but a decent start I think.
http://buonfresco101.blogspot.com/