
PREPARATION (Nov 2)
First we cleared space on the back brick wall to paint a fresco at the Sculpture Resource Center:

Then we unpacked the clay fresco metal lath, which we bought from The Fresco School. The large roll came tightly wrapped, in a corrugated plastic tube:

Gonzalo cut a section 40 x 55 inches:

Then he tacked the fresco lath on the wall with two nails. Some of the clay fell off, as it is attached to the lath somewhat fragilely:

Gonzalo evening the lath with a level:

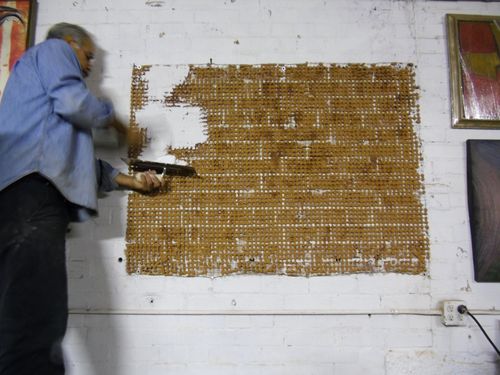
Jorge suggested that we chip the paint off the bricks, before applying the fresco plaster over the lath:

More than half of the paint chipped off the brick surface:

After all the paint was removed, we replaced the fresco lath on the brick wall:

ALL SOULS PROCESSION (Nov 6)
Later that weekend, Tucson hosted the All Souls Procession. The TuTanKamote float was partially built at the Sculpture Resource Center (XeroCraft hackerspace also paraded their version of a large skull):

There are 3 more float videos on YouTube -- TuTanKamote, The Aparition, and TuTanKamote on Congress Street:

Moises from the Sculpture Resource Center welded the platform that was used to raise the acrobats at the All Souls Procession. Here Moises is on stage as the urn is lowered:

PLASTERING THE FIRST COAT -- the ARRICCCIO (Nov 7)
The day after the procession festivities, we screwed the fresco lath to the wall:

Screw and washer:

We also used regular nails to attach the lath to the wall:

Gonzalo nailing the edges, to make the lath hug the wall more tightly:

Prepared to mix the plaster:

We used more than half a bucket of lime putty, and the 30/50 marble sand (both from American Clay) -- 1 scoop of lime putty to 2 scoops of sand (24 oz scoops). Ultimately we mixed 11.5 scoops of lime putty, with 23 scoops of sand, which was just the right amount:

Gonzalo poured the water off the top of the lime putty, before I scooped out the lime:

We mixed the lime and the sand with a power drill, but trying to use a slow speed, to avoid mixing too much air into the plaster:

Someone had to hold the bucket, so that the power drill did not spin it:

Pudging the mix with a 1.25 inch dowel, to get the air out of the plaster:

Audra sprayed the lath and wall with distilled water, though ultimately we did not wet the surface very much:

Selection of trowels, and wooden float (which we did not use):

Finally! Gonzalo said that the plaster felt like cream cheese with sugar (the sand imparting the sugary texture), and went on easily. -- but not quite as smoothly as in the Fresco School video:
The lath grabbed the plaster well -- but the plaster did not reach the supporting brick wall:

The lath did not lay flat on the wall, so the final plastered surface was a little wavy. Audra commented that the marble sand made the surface very white:

Gonzalo roughens the plastered surface slightly with a horse comb, creating a texture that the next coat can hold on to:

We hung a wet burlap cloth from a wire, in front of the freshly plastered fresco. The aim is to keep the air humid, so that the plaster does not dry too fast and crack. However, not only was this a cold day in Tucson (apparently there was snow in the mountains), but it rained a lot in the morning, so conditions should naturally slow the drying down. Had we plastered in a Tucson summer, we would have to fight the heat and desert dryness a lot harder, in order to keep the plaster from cracking:

Gonzalo plastered to almost the thickness of a dime:

The arriccio coat cracked, however, by the next morning at 11 AM:

More cracks around the corner. The previous night was very cold, towards freezing not far from Tucson:

More cracks at the top. The plaster was cold to the touch, rather than wet, and probably weak:

A nail rusted and effloresced through the plaster:

I resoaked the burlap and hung it in front of the fresco wall again:

When we returned at 6 PM, the cracks had grown -- one was 10 inches long. The day was cool, but Tucson air was definately dry, because the burlap dried out. Perhaps the panel was drying from the back too, since the plastered lath separated slightly from the wall. Maybe we did not mix the plaster well enough, or pushed too much air into the plaster when using the power drill, and those factors made the panel crack:

OPEN STUDIO (Nov 12 and 13):
We set up the fresco we had so far around the blank wall, for the Open Studio tour at the Sculpture Resource Center:

REPAIR (Nov 14)
We gouged out the cracks with metal rasps (bought at Woodworkers Source in Tucson), in order to replaster the flaws:

Only plastered a week before, the surface was dry, but weak. The plaster felt crusty, and crumbled off when we gouged the cracks:

Gonzalo noted that the bigger cracks formed where the clay metal lath did not touch the brick wall before. Detail of the gouged cracks:

We mixed lime putty (bought locally at Natural Building Materials) and 30/50 marble sand, both from from American Clay, to make the repair plaster:

One lime putty to two sands:

The mix was very dry at first, and seemed like it would never get smooth working it by hand. The final plaster felt somewhat sandy:

We sprayed the cracks with distilled water before replastering them:

Gonzalo filling in the cracks with the fresh arriccio plaster:

This time we were going to cover the fresh plaster in plastic, so that it would not dry so fast and crack. Gonzalo is building a frame to cover in plastic:

The frame fits over the fresco:

Pinning plastic on the frame:

We covered the repaired fresco with a plastic cover, so that the plaster fillings will not dry too fast and crack again:

We uncovered the wall fresco (Nov 22) and found that the repaired patches dried without cracking. We did miss filling some gouges, and apparently we over looked some cracks (I do not think that the fresco cracked more after we covered it in plastic). The patches were still a bit sandy, and thus too soft to plaster over right away:

The drawing for the wall fresco:

Traced drawing pinned to the fresco browncoat:

Large selection of pigments ground in water:
 INTONACCO -- Painting Day
Gonzalo painted the wall fresco on a cold wet day (December 1). Mikey first plastered 2 coats of intonacco.
Mikey opted to hand mix 5 scoops of lime to 8 scoops of 80 grit marble dust (12 ounce scoops, both lime and sand from American Clay):

Showing off the creamy body of the fresco plaster:

We sprayed the surface with distilled water before plastering:

Plastering begins sometime after noon -- Mikely applied the plaster very thinly:

Mikey did not have enough plaster left to cover the edges, so he mixed more -- 2.5 scoops of lime to 4 scoops of sand:

Plastering to the bottom edge:

Plastering to the right edge:

The first intonacco coat was finished by 1 PM. We hung wet burlap, to keep the air wethumid, so that the plaster would not dry too fast and crack:

Then we went for "mental menudo":

Unfortunately I spotted a few small hairline cracks when we came back from lunch about 3 PM:

Cracks also formed on the edges, where Mikey had packed the plaster thickly:

We used half of a 5 gallon bucket to make the 2 intonacco coats:

Mikey used the same amount of plaster for the the last intonnaco coat --the skim coat. Thus he mixed 7.5 scoops of lime to 12 scoops of 80 grit marble dust sand (12 ounce scoops):

Plastering the final painting coat:

Half done -- the gray side being fresh wet plaster, the whiter side being what we plastered a few hours before. Mikey finished the skim coat at 4:30 PM:

Many small hairline cracks surfaced immediately, as soon as the plastering was finished. These cracks did not form because the plaster was too wet, and dried too fast. Mikey plastered thin, and we did not spray the surface below, which had just been plastered hours before (Were the cracks formed from the pressure of plastering, or was the lime and sand not mixed enough?):

Original sketch:

Gonzalo using a pounce wheel to punch small holes in the larger drawing, on tracing paper:

Gonzalo rubbing dry pigment onto the pounced tracing paper, to transfer the drawing to the fresh plaster:
Tracing paper with blue pigment:
Transferred drawing:
The painting begins at 6 PM, while it was raining outside, below 50°:

Lime water and color chart. I painted a quick color chart with the leftover plaster. Gonzalo would just point to the chart and asked for a color. I would then hand the ground pigment bottle to him, and he mixed it with lime water:

Table with brushes and pigments. Measuring scoop is filled with raw lime putty, to use as white paint:

Painting:


Final painting, finished at 1:45 AM (almost 8 hours later):

Gonzalo painted with 12 pigments: Mayan Blue, Mayan Violet, Mayan Yellow, Mayan Green
Sinopia 799G1001A, Mayan Red Sinopia 779R2051, Yellow Ochre Golden Warm,
Bohemian Green Earth 41800, Raw Umber Greenish 40630, Venetian Red Italian 40510, Iron Oxide Mars Red from Mexico, Burnt Sienna, deep crimson shade from cyprus
Sinopia 190PM, Raw Umber, very dark neutral shade Sinopia PC414RU
We covered the fresco with plastic (to keep the air humid, so that it would not dry too fast and crack), with a "Don't Touch" sign:

Four days later we removed the plastic cover from the fresco (Dec 5), and looked closely at the texture on the dried surface:

Several hairline cracks surfaced. However, they might have resulted more from the thin plastering rather than from drying too fast. Perhaps if we mixed the plaster better, and let it sit overnight, it would have been more elastic. Overall, the cracking was not too bad:

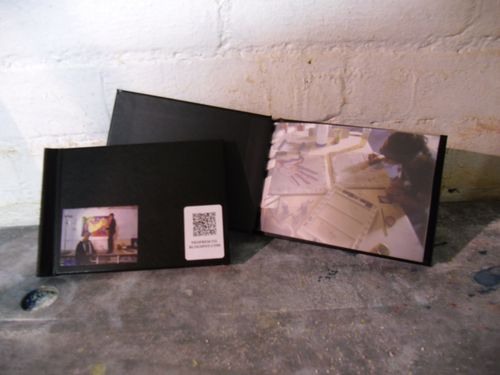
I made a 10 page photo book at CVS, to easily show off the process in public. I also placed a QR Code sticker (made at Office Max) on the front, so that those with smart phones can come to this this blog, after quickly scanning the checker board-like design:
krrl, this beautiful. what a process. nice to see mikey. where did you get mental menudo? you are famous!! tanya
ReplyDeleteYou have discussed an interesting topic that everybody should know. for home repairs, wall crack repair, wall crack, fixing cracks in walls you can visit this site sunken floors and piers visit the site to know more about Buildfix Blog.
ReplyDelete